Telescope Primer
for SJAC, by Wayne Ernst, Summer 2025
When embarking on your own journey into astronomy and learning the night sky, inevitably, the question of using a telescope will arise. That is, after all, probably the first image that comes to mind when thinking about an “astronomer” of any kind: a silhouette of someone out in a field standing next to a telescope, looking up at the vastness of the dark, starry nightscape. But for someone just starting out, there are so many different telescopes that could be purchased. How do you separate out marketing gimmicks from useful specifications? How do you determine what telescope is “right” for you?
These questions are important because, very often, a newcomer to astronomy will go out and buy—or have gifted to them—a telescope that they think is the “biggest, best thing” they can get. They may not understand how to use it well or try to use it in applications for which it is not well-suited (or, worse, the equipment itself may not have been that great to begin with), and before long, what was meant to be an exciting new adventure turns into a source of frustration. The telescope soon sits untouched in a closet or garage gathering dust, and the new astronomer finds themselves disillusioned and no longer passionate about astronomy.
While no guide is perfect, this page is meant to serve as a gentle introduction to the different kinds of telescope there are, what their specifications mean, and what can separate poor quality, hard to use equipment from something a newcomer can actually use and learn with. On this page, we are focused on using telescopes for visual observing; astrophotography is a whole other story to be told elsewhere. Should any of this information be confusing or raise further questions, please consider joining our club and asking questions of our members. We want to help you learn and grow your interest in this field, and are happy to lend our experience to your questions!
So, What Telescope Should I Get?
The glib, seemingly-unhelpful response to this question is, “the one that you will actually use.” It can be easy to “go big or go home” when diving into a new hobby like this, but going big can mean literally going big, in astronomy—that is, bulky, heavy, difficult to set up, and so on. Even if you wind up loving the views you obtain from such a telescope, the difficulty and physical labor of dragging around a very large telescope and setting it up may just become an obstacle to you actually going out and enjoying the hobby: you may find yourself saying, on some nights, “I’d like to go out and look, except it’s such a pain to get it set up…” whereas if you had made a more informed choice and gotten something more manageable, you might be going out much more often.
So, What Should You Get?
There is no real substitute for experience, so if you can, we suggest trying to get your feet wet by learning to identify some things in the night sky without the aid of a telescope (just using your unaided eyes) and even attending an event and looking through a few telescopes, yourself, before you commit to purchasing a telescope of any kind. Try to resist buying the first flashy thing you see in a magazine or online advertisement that seems to look the coolest before you know what you are getting. But if you cannot be swayed and absolutely must buy a telescope right away, if you take nothing else from this page, there are generally two common recommendations for introductory telescopes that can be had for reasonably constrained budgets of about $500 (at the time of writing, Summer 2025):
1) a 3”-4” refracting telescope on a decently-stable altitude/azimuth (“alt/az”) mount; or:
2) a 6”-8” reflecting telescope, typically in a “Dobsonian” mount (it is also “alt/az,” but a special kind built for reflecting telescopes that is intuitive for beginners).
And then follow a brief word of advice: be very wary of advertisements that claim “maximum magnification!” or have similarly-breathless claims about any other aspect of its design if you do not know what it means or why you would want it.
If we are looking for even more affordable options for very new beginners (such as middle- and high-school students), a smaller, 4”-or-less “tabletop Dobsonian” could be had for $300 or even less, but this should come with tempered expectations: such models may be harder to aim without practice, and should likely only be expected to see very bright objects like the Moon, planets and very bright special objects like the Pleiades and Orion Nebula.
If even $100-$200 might be too expensive to justify for a special-purpose piece of equipment like a telescope, you might consider purchasing a pair of decent binoculars and a tripod on which you could mount said binoculars. You would be amazed at just what you can see in the night sky with a good pair of binoculars! Binoculars can also be used for other applications, like sporting events, concerts, and nature observation while hiking and more.
For anyone interested in understanding just a little of why all of the above are decent general recommendations, the rest of this page is aimed at demystifying some of the technical language and weighing the pros and cons of different telescope types and their associated equipment.
“What Do You Want to See?”
This should really be the first question that we answer before we consider what kind of telescope would be best for you, because if you have a particular preference, some equipment will be better-suited for the task than others. There are three broad categories of objects to observe in the night sky, with a range of magnifications that would best fit the purpose:
Object Type | Magnification Needed |
Stars, Double Stars, Constellations | For individual stars/constellations, none; For double stars, this will vary, but generally > 5-10x |
Solar System (Moon, planets, etc) | Moon texture: ~5-10x; Moon craters: > 15x or more; Jupiter’s major moons: > 15x, 50-100x even better; Saturn’s rings: > 25x, 50-100x even better |
Deep Sky Objects1 (star clusters, nebulae, galaxies) | Generally < 20x |
1 With these objects, the thing to focus on with observing is not magnification, but light-gathering power (the main aperture of the telescope). See further on for more information!
As you can see, you really do not need “crazy” amounts of magnification for most objects we may want to observe. Certainly try to avoid any telescopes that make overly-excited claims of “MAXIMUM MAGNIFICATION” or “300x!!” especially because, as is discussed later, there are limits to how much magnification is “useful” for a given telescope.
When thinking about these objects, then, that helps narrow down what magnification is needed, which can help filter by what specifications will take priority:
Type of Observing | Spec(s) with Priority | Other Thoughts |
Stars, Double Stars, Constellations | None; maybe binoculars?; If binoculars, 5x-15x. | May not need equipment at all to get started! |
Solar System (Moon, planets, etc) | Medium to higher magnification beneficial. Focal length (longer ~ higher magnification) helps achieve this. | Higher magnification is more sensitive to vibrations; make sure mount is sturdy! Expect to need to adjust view more often at higher magnifications |
Deep Sky Objects (star clusters, nebulae, galaxies) | Faint, so need to gather more light. Aperture (bigger is better) helps achieve this. Focal ratio (“f-number,” “f/#”; smaller is generally “better,” often called “faster”) | Higher magnification is not always better for these objects! Most observations done at low and medium magnifications. |
Solar | (Specialty observing; ask for advice on filters and other equipment!) | REQUIRES at least a solar filter for safe observing. EXERCISE CAUTION AND DUE DILIGENCE. |
Balancing various factors, then, this table is probably a good starting reference to guide some purchasing recommendations, backed up by reasoning from all the other definitions and discussion later on in this page:
Type of Observing | Recommended Equipment | Alternate |
Stars, Double Stars, Constellations | Binoculars, Eyes | Small refractor (3” < x < 4”) or ~4”-6” Dobsonian reflecting telescope |
Solar System (Moon, planets, etc) | ~6” Dobsonian reflecting telescope | Small refractor (3” < x < 4”) or “Tabletop” Dobsonian (but temper expectations at higher magnifications) |
Deep Sky Objects (star clusters, nebulae, galaxies) | ~6” < x < 8” Dobsonian reflecting telescope | Small refractor (3” < x < 4”) |
You will notice that our recommendations for reflecting telescopes specifically mention “Dobsonian.” This refers to the specific mount design for these telescopes: it is a fairly-intuitive setup that allows for a gentle introduction to learning how to aim and point a telescope that can be long and bulky, like a reflecting telescope. Refracting telescopes tend to be much smaller and more compact by comparison, so while they often follow a similar sort of aiming style as the Dobsonian mount, refractors are more commonly mounted on comparatively smaller tripods.
You can then see why our recommendations are what they are: either one of the two recommended general kinds of telescopes would be versatile enough to cover most general astronomical objects, and if you want to move toward observing a particular kind of object, you can always upgrade to a more specialized telescope later on as you become more experienced. If you are still unsatisfied as to why these recommendations are what they are, you should learn some basic vocabulary about the specifications of telescopes and their accessories and what some of the main differences are between the various types of telescopes. The rest of this page is devoted to just such information.
Telescope Vocabulary
There are a few words that are common to all telescopes regardless of types that are listed as specifications which are useful to know:
1) Aperture: this refers to the main opening through which light enters the telescope. A bigger aperture means more light, but this scale is not linear, because it goes with the area that gathers light, not the diameter! An 6” opening gathers four times as much light as 3” opening, because the area of a circle is . Because of this, we do not need massive apertures to achieve decent light-gathering power, but generally, a decent minimum aperture of 3” for refracting-type telescopes and about 6” for reflecting-type telescopes is recommended to allow for some basic versatility in introductory telescopes.
2) Focal length: this refers to the distance from the first lens or mirror used to focus light to where the light will actually focus. The longer the focal length, the more magnified all images in the telescope will be (and generally, the longer the tube itself will be).
3) Focal ratio: this is the result of dividing the focal length by the diameter of the main telescope opening. For example: a 1,000 mm focal length telescope with a diameter of 8” (203 mm) will have a focal ratio of 4.9 (typically written as f/4.9), while a telescope with a 600 mm focal length and a diameter of 4” (102 mm) will have a focal ratio of f/5.9. It is generally expressed that a smaller focal ratio is “faster,” meaning that is gathers light more “efficiently,” which is useful to know for those interested in pursuing astrophotography. “Faster” does not necessarily always mean “better;” it depends on the application and what you are trying to do with your telescope.
4) Limiting magnitude: this refers to the faintest object that can be seen with the telescope. With just our eyes, we can see objects down to magnitude 6 (where increasing numbers corresponds to decreasing brightness: magnitude 3 is brighter than magnitude 4, is brighter than magnitude 5, etc). For quirky historical reasons, a difference of 1 magnitude is a factor of about 2.5, so a magnitude 3 object is 2.5×2.5 = 6.25 times brighter than a magnitude 5 object. Generally, the larger the aperture and the smaller the focal ratio, the fainter the objects you will be able to see; most “regular” telescopes tend to top out at around magnitude 12-16, depending on particular type and specifications.
5) Weight: self-explanatory, this is the literal weight of the telescope. That is useful both to know how much you will need to carry around (if you want to bring this out into the woods), or how much the tripod and mount can hold (if you wanted to mount other equipment, like a camera, onto the telescope at the same time).
6) Useful magnification: not all vendors may list this, but some will. This refers to how much the telescope can magnify an image before the image itself will begin to degrade in quality (get fainter and fuzzier). A general rule of thumb is either the “50x” rule (“50 times the aperture in inches”) or “2x” rule (“2 times the aperture in millimeters”).
All the other specifications are generally more advanced than we need to discuss, here, for our basic “My First Telescope” overview and advice.
Telescope Types
Probably the most common misconception about what a telescope does is that it “makes things look bigger.” While they are capable of doing so, the main design purpose of a telescope is to gather light to make faint objects appear brighter. Most objects in the night sky are so far away that they will never appear as anything other than points of light, with the main exceptions being the Moon and planets. Objects like star clusters, nebulae and galaxies will have an actual size in the sky, but do not need that much magnification to be appreciated; instead, they are very faint, and so gathering more of their light, not magnifying them, is what will make them visible to us.
There are three main kinds of telescope that gather light in different ways, and how they gather that light has implications for their other specifications: their size (both their main opening and their overall form factor); their weight; and what they use to focus the light into an image we can see (lenses or mirrors).
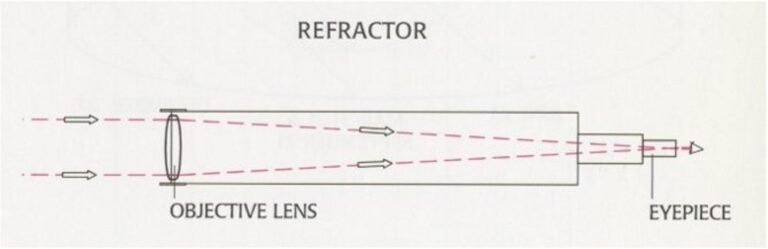
Image credit: Adler Planetarium & Astronomy Museum
1) Refractor telescopes: this is probably the image that comes to mind for most people when they conjure a mental image of a “telescope.” It looks like a pirate’s spyglass: light from a distant object passes through the main (“objective”) lens, then is formed into an image by a second (“eyepiece”) lens. Some fancier, more expensive refractor telescopes may have a second or even third intermediate lens for reasons discussed later on this page that help make the image you see clearer. They are called refractors because that is what the lens does: light refracts as it passes from air into the lenses and back out into air, just like how light bends and makes a funny image of people swimming in a pool or a straw appear bent when placed in a glass of water.
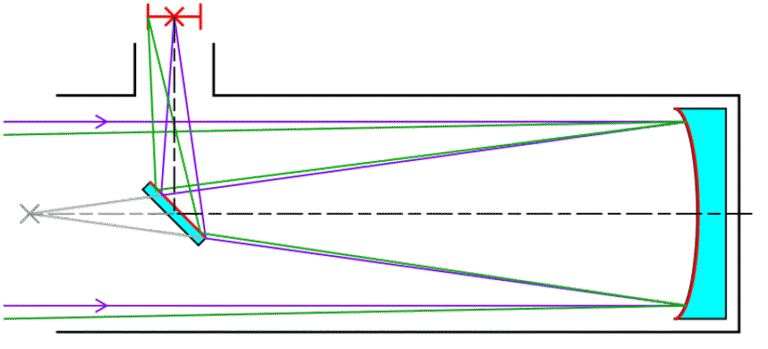
Image credit: Krishnavedala, 22 August 2014, Wikimedia, Creative Commons License
2) Reflector (“Newtonian”) telescopes: these are another fairly-common design of telescopes that use mirrors instead of lenses: light enters the main opening, bounces off the big “primary” mirror at the bottom of the telescope, then bounces off of a smaller “secondary” mirror mounted nearer to the main opening, and then is focused into a final image using an eyepiece. It is called “Newtonian” after its inventor, Isaac Newton (the same guy who helped figure out a bunch of stuff about gravity a few hundred years ago). They are called reflectors because the mirrors reflect the light before getting to the eyepiece, rather than refracting light.
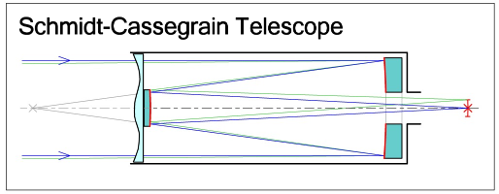
Image credit: ArtMechanic, 3 March 2005, Wikimedia, Creative Commons License
3) Cassegrain (“SCT”) telescopes: these telescopes can be thought of as a “hybrid” of both reflecting and refracting telescopes because they often combine both mirrors and lenses to reflect and refract light at different points along its path from main opening to your eye. There are different designs that fall under this broad umbrella, such as Schmidt-Cassegrain; Maksutov-Cassegrain; and others, but they follow the same general idea as one another.
With these types of telescope delineated, which one is “best?” That is difficult to answer, because they each have their advantages and drawbacks resulting from how they focus light and how they are constructed, as well as a wide variety of specifications for individual models from different manufacturers. This table provides a general overview of the advantages and drawbacks of each.
Telescope Type | Advantages | Drawbacks |
Refractor | Light passes directly through lenses (no obstructions) Tend to be lighter weight overall, smaller form factor | Can be more costly than other types, especially for wider apertures or higher-quality lenses Chromatic (color-based) distortion (can be corrected, $$$) Larger apertures require very heavy objective lenses Can be difficult to see objects closer to zenith (directly overhead), depending on design of mount, telescope and eyepiece holder |
Reflector (Newtonian) | Tend to have longer focal lengths (higher magnification) Tend to have higher light-gathering power Do not suffer from chromatic (color-based) distortions Fairly comfortable eyepiece height for viewing at nearly all angles | Can be larger, heavier and bulkier to deal with Secondary mirror obstructs some light passing through aperture (though most light passes without obstruction) Coma (shape-based) aberration inherent to parabolic mirrors (can be corrected, $$$) |
Cassegrain (SCT) | Tend to be very compact, somewhat lightweight Can have very large focal lengths relative to form factor Tend to have less optical distortions (if properly manufactured & collimated) | Tend to have much larger focal ratios (“slower” light-gathering power) Tend to be more expensive because of design and optics inside Some optical distortions still present (can be corrected, $$$) |
No optical system is perfect; each one has benefits and drawbacks. For example, lenses and mirrors are curved by design in order to focus light into an image. What shape the lenses and mirrors take can lead to more or less apparent distortions: on the inexpensive side of manufacturing are spherical lenses and mirrors, which have the most-apparent distortions. These are typically found in “toy” telescopes and optical equipment that is maybe useful to show off the Moon and maybe a planet, but little else for anyone who wants to “really look” at objects in the sky. Parabolic mirrors and lenses are a step up in price to manufacture, but have a corresponding step up in the quality of the images they produce. Both spherical and parabolic mirrors and lenses can have their distortions reduced with additional corrective lenses placed somewhere in the light path of the telescope, but this adds additional manufacturing and design cost, which translates to additional price paid for the equipment.
Mounts
Perhaps even more important than your telescope itself is the thing that the telescope sits on, the mount. Depending on options and features, some mounts can cost as much as, if not more, than the telescopes they carry! Broadly-speaking, mounts can be categorized under “alt-az” or “equatorial” types:
Alt-Az: “What your head does”
Alt-az is short for “altitude/azimuth,” which refers to angles of measurement. “Altitude” refers to “how high above the horizon” an object can appear, while “azimuth” refers to an angle taken from zero degrees (North), ticking upward to 360 degrees as you rotate eastward until you reach North again. This kind of mount is fairly-intuitive, especially for beginners, as it mimics what our head does: it tilts up and down, and swivels horizontally.
One particular kind of alt-az mount that is very popular with beginners is the Dobsonian, which has been mentioned in other parts of this primer. The Dobsonian is typically a combination of a decent-sized reflecting telescope (beginning at around 6”) and sits on a base that can pivot up and down and swivel left and right. The design was invented by John Dobson in the 1960s, and made astronomy much more accessible to amateurs because of the relative ease of use: one can literally just grab the tube and swivel around manually to aim at and observe objects!
Equatorial: “Track the Stars”
The other kind of mount type is the “equatorial” mount, also referred to as the “German equatorial mount” (GEM). This kind of mount will also tilt and swivel, but is meant to be aligned in a particular way. With alt-az mounts, the altitude angle ranges from 0 degrees to 90 degrees, with zero being your local horizon and 90 being directly overhead. In the equatorial system, however, 0 degrees is meant to match Earth’s equator and 90 degrees is supposed to point directly at the North celestial pole (where Earth’s North geographic pole points, near the North Star, Polaris). This means that using an equatorial mount will require knowledge of where on Earth you are observing from—particularly, your latitude—as you will need to set the equatorial mount to correspond to your latitude, and make further small adjustments to align the mount itself with the true North pole. Each equatorial mount may be slightly different from one another, so the steps to make this alignment will vary, but the general concepts of the process are the same. Once properly-aligned, the equatorial system uses two angles like the alt-az system, but in equatorial coordinates, the “alt-az” is replaced with “Dec/RA”—that is, “declination” and “right ascension.”
When aligned, all the main objects that you might like to observe outside of the Solar System (double stars; star clusters; nebulae and galaxies) have relatively-fixed coordinates in the sky relative to one another, so finding an object—or at least getting very close—is as simple as turning the Dec/RA setting dials to the desired positions. What is more, as the night progresses and the Earth rotates, for a well-aligned equatorial mount, one can just slowly turn a knob on the mount to counteract the rotation and keep an object in view.
Which is “Better?”
As with many things in astronomy, which one is “better” depends. Both will require a bit of learning and skill development to be able to find objects in the sky. Alt-az mounts are generally more intuitive, especially for beginners, and so are usually recommended for those starting out in order to avoid layering on extra steps like getting proper alignment with an equatorial mount. In both cases, having “slow-motion adjustment” knobs is a nice-to-have feature that can help reduce frustration, as you can (usually) slowly turn the gears with your fingers to adjust your view at a much more desirable rate than ham-fisted motions. Such smaller, slower adjustments let you glance between star maps and your live eyepiece view to see if you are scanning to find the object you are looking for through star-hopping. Equatorial mounts are more likely to come with such slow-motion knobs.
Another potential consideration is the weight capacity of the mounts. Typically, alt-az mounts do not require additional weights, but equatorial mounts necessarily require at least one counterweight to balance the telescope to align effectively and not place unnecessary strain on the gears of the mount. These weights do not add to the capabilities of the scope, but will limit the size of telescope and other equipment that can be placed on the mount.
What About “Go-To?”
Many telescope mounts are now sold with what are called “go-to” capabilities, which are computerized systems that can allow the telescope to—as the name suggests—“go and point to” a desired object. Such systems require initial calibration, which includes knowing the date and time and some precision around your GPS coordinates (latitude and longitude). Both alt-az and equatorial mount types can come with these computerized systems. Alignment steps will vary between different systems and manufacturers, but typically, the steps will require first manually aiming at two or three identifiable stars, so will require at least a little knowledge on your part to align effectively. If well-aligned, motors inside of the Go-To mount can also automatically turn the telescope to counter Earth’s rotation, keeping objects in view for minutes at a time. Additional equipment can be purchased to keep objects not only in the view, but centered and static in the view, which would be essential for pursuits like astrophotography (beyond the scope of this primer).
Whether or not to use these systems is, as with almost anything in this hobby, a set of trade-offs. Buying a telescope with this capability will mean that, for a fixed budget, a compromise must be found between the size of telescope; quality of mount; and whether or not to purchase a mount equipped with the Go-To features. Additionally, those who wish to grow their skill in manually aiming at the sky may find the Go-To features hamper this skill development because a machine is doing the aiming, instead of you, the astronomer. Others who wish to simply view many different objects quickly and efficiently without much concern for finding the objects themselves may like the capability of the Go-To systems, but may also find frustration if they do not achieve good alignment and cannot recognize the field of view around their desired target, and so cannot so easily make the manual adjustments that could be needed to find the object(s) for which they were looking.
As said already: trade-offs abound in a hobby like astronomy. Only you can decide what budget you would like to set, what type(s) of objects you would like to see, and what you want to learn from engaging in this interest!
Accessories: Finderscopes, Eyepieces, Filters & More
Once you have the main body of your telescope selected, next come the accessories used either to help aim the telescope or the actual bits through which you look at images of the universe. In most cases, when buying a telescope, your purchase will come with at least a couple of these accessories.
1) Finderscope: this device sits on top of the main body of the telescope and is used, as the name suggests, to find objects in the sky. It generally has a low, fixed magnification on purpose: you should start with low magnification when finding objects, and adjust your view to a higher magnification if desired. When you first set up your telescope, especially after purchase, you will likely need to align your finderscope with the view in your main telescope; reach out to us for help, if you have questions! There are also alternative devices called “telrads,” which have no magnification at all, but sit in the finderscope spot and have little circles that can be used to “starhop” from one object to the next in even increments across the sky; such a device can be useful for those who really want to learn the sky visually and learn how to aim a telescope manually.
2) Eyepieces: this is the piece through which you look, regardless of telescope type. For respectable telescopes, the common barrel sizes are 1.25” and 2” in diameter, and any such eyepiece should fit into any telescope that accepts those widths. Most telescopes sold come with two eyepieces each with their own focal lengths; common focal lengths included in such bundles are 25 mm and 10 mm. The combination of focal lengths of the telescope and eyepiece determine magnification by their ratio: a 1,000 mm focal length telescope with a 25 mm focal length eyepiece will have a magnification of 40x. When considering making additional purchases of eyepieces, it is useful to consider having a spread of magnifications. You do not need to purchase every possible focal length of eyepiece! Eyepieces also have their own set of specification vocabulary to be aware of, with a couple of terms that are especially useful to know:
a) (apparent) field of view (aFOV): this is the width of the area that you think your eye can see while looking through the eyepiece. Your natural field of view with just your eyes is about 200o horizontally (left peripheral to right peripheral) and about 135o vertically (top of vision to bottom). Typical eyepiece aFOV is about 58o; the bigger the number, the wider your view, and likely the more expensive the eyepiece.
b) Eye relief: this refers to the distance between the eyepiece and where the image it makes forms, which translates to how far away from the eyepiece you need to place your eye in order to see the image. The larger this number, the more “comfortable” the viewing experience will be, because you will not need to cram your eyeball up close against the equipment to see what you want to see.
There are more specifications that may be listed with eyepieces, such as “exit pupil,” but these two are likely the most important for beginning astronomers. When purchasing additional eyepieces, there is a wide range of designs (and names), which come in a wide range of quality, which come with a wide range of prices; some individual eyepieces may even cost more than some low-budget telescopes! It is very easy to get lost in the weeds of all the terminology on these. Seek advice if you want to compare different eyepieces with one another.
3) Filters: depending on type and use case, these may sit over the main aperture of the telescope or may be threaded into the bottom of the eyepiece. Wherever they are in the light-gathering process, they are meant to limit the light coming through the telescope for some reason or other. Some, like a Moon or polarizing filter, are meant to block a significant portion of light to lower the intensity while observing such bright objects (viewing a full Moon through a telescope can be surprisingly bright!). Others, like light pollution filters, try to block specific wavelengths of light associated with light from cities and streets (but also will block any natural light of those wavelengths, as well). Still others may block or allow only specific bands of colors, like red, green, blue, or even some infrared, which are useful for photographers to learn about. There are other specialty filters, like solar filters, that cover the whole aperture of the telescope to enable direct observation of the Sun. Exercise due caution and safety precautions when considering and using such devices; talk with some of our members or consult reputable suppliers and sources when considering doing this kind of astronomy!
4) Barlow lenses: these get a special mention because they are not quite an eyepiece and not quite a filter: they are made of a barrel that holds an eyepiece and contain a lens that sits between the main body of the telescope and the eyepiece along the path light takes to your eye. They have a static magnification factor, typically 2x, 2.5x, or 3x. This can make, say, a 10 mm eyepiece “behave like” a 5 mm eyepiece (in the case of a 2x Barlow). Some astronomers like Barlows because it reduces the number of physical eyepieces needed to have a range of magnifications, if planned strategically; others do not like them because, with the lens being another piece of glass through which light is passing, reduces the amount of light actually reaching your eye. Only you can know whether such tradeoffs are worth it, for your experience and budget.
5) Dew heater: as the air cools, it is possible for the air temperature to reach the dew point and water vapor will begin to condense into liquid water over everything, including your telescope and equipment. This can lead to distortions on your mirrors or lenses and affect what you see in your eyepiece, not to mention potential damage if not properly-cared for. A dew heater does what it suggests: heats your telescope (especially the hollow tube of a Newtonian reflector) to prevent dew from condensing on your equipment. This is not entirely essential equipment for most introductory users, but would become more important for applications like astrophotography.
6) Power supply: depending on whether your telescope and mount are computerized in some way, or if you get a dew heater, or other electronic accessories, you may need a power supply to ensure a stable source of electricity to run the motors in the gear at expected rates, especially over an entire night time of observation. Considerations for these are beyond the scope of this page, but it is just worth mentioning as a last afterthought.
7) Red lights: while working in the dark, your eyes will naturally open and adjust to allow more light to pass through. When you go to change something about your equipment (say, swapping an eyepiece), though, you will naturally want to be able to illuminate your equipment so you can see what you are handling. The problem that will arise is that if you use a standard flashlight to help you, the white light will cause your pupils to shrink, and you will lose your dark adjustment. However, if you use a red flashlight (a light designed to emit only red light), our eyes do not respond as strongly to red light as opposed to white light (which is composed of all colors), and so unless the red light is very intense, we can illuminate our workspace without affecting our dark adjustment too much. Red lights are sold individually, but in a pinch, a white flashlight covered with red cellophane can substitute fairly well.
8) Observing chair: one last thing to consider is a place from which to comfortably observe! Whether you opt for a chair that can recline (partially or fully—the latter of which is useful for meteor showers), a chair with a small tray or cupholder attachment, or even adjustable height is for you to decide, but definitely an easily-overlooked piece of equipment that can help extend observing sessions.
For the most part, all of these devices are interchangeable and able to be upgraded after your first purchase. Even the focuser—the thing that you adjust to actually achieve focus—can be swapped out and modified on some models of telescope, if so desired. It is not that uncommon for amateur astronomers to swap out parts of this or that telescope as if they were working on a hot rod in their garage. Some even go so far as to try to build their own telescope according to specifications that they want, instead of mass-produced manufactured equipment. As you become more familiar with what is out there in the field of astronomy, you, too, can decide for yourself what is worth your dollars to buy, upgrade, trade, sell, or build on your own.
Final Thoughts
We can end this primer where we began: “What telescope should you get?” The answer was, and still is, “the telescope you’re most likely to actually use.” But if you have read and understood most of what is on this page, hopefully you have some kind of mental image of what such a telescope may actually look like. You may know what kinds of objects you may want to look at, or if you want a telescope that is versatile enough to flip between observing different kinds of objects. You may even have ideas of what kinds of accessories may be included, or what you may need to look into purchasing to help you go look. We hope that at the end of this reading that the reasoning for our initial recommendations make some sense, and why we cautioned that those recommendations can only be general. After all, we are not sponsored by any manufacturers, and while we may each have our individual brand loyalties, it is difficult to say—for once and for all time—“buy this particular model of telescope” when a company may go bankrupt, or manufacturers may change quality with time, or even better individual products may come out in the future. Still, now you should at least have some tools and vocabulary that will empower you to make a more informed decision for yourself.
Once you have, please join us out on the field, and look up with us!